Define Requirements
A single decision is added to the canvas to get you started.
Select the decision and double-click it to change the (human-readable) name to Inventory Level.
When the decision is selected, the properties pane can be used to configure it.
Open the General section of the properties and change the ID field to inventory_level.
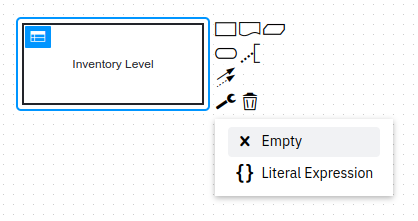
We’ll create a literal expression to contain the formula for the inventory level. The default decision type in Camunda Modeler is a decision table, so it needs to be changed. When the decision is selected on the canvas, a pop-over menu is displayed. Use the 🔧 wrench icon to change the type of the decision to a Literal Expression.
Use the same pop-over menu (or the palette) to add three information requirements for this decision. You can link them to the Inventory Level decision with a solid arrow if that doesn’t happen automatically. Add the following input data elements:
-
Warehouse stock level
-
Orders
-
Spare parts reserve

Good job! The requirements are now defined, so we can move on to the decision logic itself.